Clounagh Technology and Design
Soldering
Soldering the components
There is a display board in each of the manufacturing rooms and they show the following:
-
The soldering iron.
-
What a dry joint will look like.
-
The tip of the solder tinned.
-
An exploded view of the solder showing that there is flux inside.
-
A picture of all the tools used in this process.

Soldering Safety Rules
When soldering the components onto the PCB it is essential to follow a set of safety rules:
-
Never touch the element or tip of the soldering iron. They are very hot (about 400°C) and will give you a nasty burn.
-
Always return the soldering iron to its stand when not in use. Never put it down on your workbench!
-
Work in a well-ventilated area. The smoke formed as you melt solder is mostly from the flux and quite irritating.
-
Avoid breathing in fumes by keeping you head to the side of, not above, your work.
-
Wash your hands after using solder. Solder contains lead which is a poisonous metal.
-
Wear safety glasses! These will protect your eyes from any hot metal.
-
Take great care to avoid touching the mains flex with the tip of the iron. The iron should have a heatproof flex for extra protection. An ordinary plastic flex will melt immediately if touched by a hot iron and there is a serious risk of burns and electric shock.


Preparing the Soldering Iron:
-
Place the soldering iron in its stand and plug in.
-
The iron will take a few minutes to reach its operating temperature of about 400°C.
-
Dampen the sponge in the stand. The best way to do this is to lift it out the stand and hold it under a cold tap for a moment, then squeeze to remove excess water. It should be damp, not dripping wet.
-
Wait a few minutes for the soldering iron to warm up. You can check if it is ready by trying to melt a little solder on the tip.
-
Wipe the tip of the iron on the damp sponge. This will clean the tip.
-
Melt a little solder on the tip of the iron. This is called ‘tinning’ and it will help the heat to flow from the iron’s tip to the joint.
-
Tinning only needs to be done when you plug in the iron, and occasionally while soldering if you need to wipe the tip clean on the sponge.
-
The solder we use in school is always rolled up on a dowel rod, this is to help you use it without burning your fingers.
-
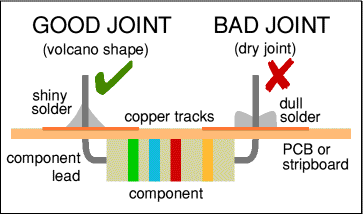
Try to avoid a dry joint similar to the one pictured below, this type of joint will not make good contact with the copper and the circuit will not work.
-
Heat the solder up enough to allow the solder to form into a cone shape. (See picture below)


You are now ready to start soldering:
-
Hold the soldering iron like a pen, near the base of the handle. Imagine you are going to write your name!
-
Remember to never touch the hot element or tip!
-
Touch the soldering iron onto the joint to be made. Make sure it touches both the component lead and the track.
-
Hold the tip there for a few seconds then feed a little solder onto the joint.
-
It should flow smoothly onto the lead and track to form a 'volcano shape' as shown in the picture below.
-
Then apply the solder to the joint, not the iron.
-
Remove the solder, then the iron, while keeping the joint still.
-
Allow the joint a few seconds to cool before you move the circuit board.
-
Inspect the joint closely.
-
The joint should look shiny and have a ‘volcano’ shape. If not, you will need to reheat it and feed in a little more solder. This time ensure that both the lead and track are heated fully before applying solder.


First Aid for Burns
Most burns from soldering are likely to be minor and treatment is simple:
-
Immediately cool the affected area under gently running cold water.
-
Keep the burn in the cold water for at least 5 minutes (15 minutes is recommended). If ice is readily available this can be helpful too, but do not delay the initial cooling with cold water.
-
Do not apply any creams or ointments. The burn will heal better without them.
-
A dry dressing, such as a clean handkerchief, may be applied if you wish to protect the area from dirt.
-
Seek medical attention if the burn covers an area bigger than your hand.