Clounagh Technology and Design
Year 9 - Box Construction Project
The wooden box is a very popular Year 9 project. It has many uses including storing coins, jewellery, hair bobbles and anything else you can think of!!!
It is manufactured using a softwood called Norway Spruce and has an MDF base. Four pieces of Norway Spruce are joined together using butt joints and wood glue and clamped in the vice.


When the frame of the box has fully bonded the ends are sanded to ensure precision when drilling holes in the corners. These holes are drilled using the pedestal/pillar drill and later in the project the importance of these holes will be revealed.


The next stage requires the base and lid to be joined, again using wood glue and clamped in the vice. It is important to attach the lid on top of the 4 recently drilled holes. The MDF base is glued onto the other side.


When the base and lid have been joined onto the frame of the box it is necessary to sand the long sides and short ends to remove any overlap, so that you cannot feel any joins in the wood. This is done by using the sanding machine and sanding board. Care must be taken as to not sand too much as you might sand through to the previously drill holes!!!
© 2017 by ClounaghTechnology


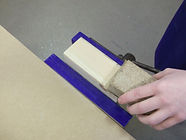
Then you must spend a lot of time giving your box a fine sanding with 120 grade sandpaper followed by 240 grade. The sandpaper must be wrapped around a cork sanding block and at all times your product is held in the bench vice. You must remember to always sand in the direction of the grain and to not sand the MDF base.


When completed the sanding process you can then either paint your box or retain its natural appearance by using a clear wax. Both finishing methods require at least 2 coats to enhance the appearance of your box and also to protect the wood.


Those boxes that have been painted can be completed by having a layer of wax put onto them and then polished using the pedestal polisher. The boxes which have been waxed only should also be polished and buffed on the polisher. This gives the box a very professional looking finish.


The next stage is to now cut a new lid using the bandsaw. As pupils are not allowed to use this machine your teacher will do this for you. When cut this will reveal 4 holes in your new lid and 4 in the body of the box. Four pieces of 3mm dowel rod are now inserted into the body of the box allowing the 4 holes on the lid to line up exactly with the dowel giving a precise fit.


Before the lid is attached a handle has to be joined to it. The handle is a separate piece of wood that must have a pilot hole drilled in its centre being careful not to drill the whole way through.
You then take the newly formed lid and find its centre on the underside by drawing two diagonal lines from corner to opposite corner. Where these lines bisect you can centre punch and then drill a clearance hole through to the other side. This hole is then countersunk to take the head of a countersink screw.


A little wood glue is then put onto the handle (onto the surface where the pilot hole has been drilled) and the countersink screw passed through the clearance hole and then screwed into the pilot hole to complete your project.